This article explains how you can update your availability to help make yours and your Guests bookings run a lot smoother!
Jump To
Navigating the Calendar
1. Log in as a host by entering your email and password you used to create your account.
2. Once logged in, go over to your Calendar by clicking the Calendar icon at the bottom of your screen.
Note: If you have added a new room or your calendar has not been updated by you for more than 28 days, the Calendar icon will have a red dot to prompt you to check your availability and update your calendar.
3. You can now update your calendar with just one click. If you know your calendar is up-to-date just click on the green button, 'This calendar is up-to-date'.
4. If you have multiple digs then you can select the desired listing using the dropdown.
Just click on the little arrows to the right of the Digs name as shown below.
Note: If any rooms need updating, you will be prompted in the red dot to the left of the Digs name as shown below.

5. If you have multiple rooms in a listing, you can select an individual calendar by tapping on the name to the left.
Top Tip: If you want to see more of your Room name(s) just click on the 'eye' icon.
6. Your chosen calendar will show received bookings and the availability of your room.
- Received bookings appear in a dark grey colour along with the name of the Guest - you can click on the name to take you to that booking.
7. Unavailable dates (made unavailable and amended by you) have a black line through the date to show they are unavailable. They also appear a darker grey.
8. If your calendar is synced with Airbnb or Booking.com, any bookings made on these sites will appear on your calendar as lighter grey blocks.

Blocking Dates
1. To set a room as ‘unavailable’ select the correct calendar from the top menu (see step 4 above).
Tap on the date boxes that you want to block, this changes the date box to dark grey.
Then tap 'Block Dates'.

Top Tip: You can also hold and drag a selection of dates.
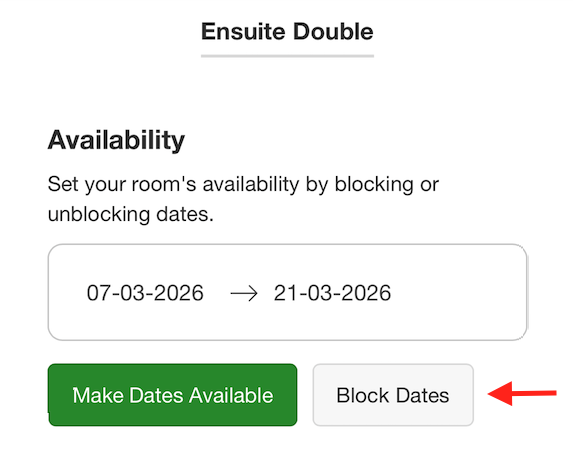
2. To block out longer periods of time, or multiple rooms/digs at once, tap on the cog above the desired calendar(s):

3. You can then use the date picker to select the desired start and end date.

4. Tap 'Block dates'.

Making Dates Available
1. To make dates available again, tap and select the blocked dates.
Then tap 'Make Dates Available'.
3. To make longer periods of time available, or multiple rooms/digs at once, tap on the cog above the desired calendar(s):

4. You can then use the date picker to select the desired start and end date.

5. Click the green 'Make Dates Available' button.

6. You can directly update your calendars with one click from your notification email.
This is great for
- Hosts that are on the move,
- Know that their calendars are up-to-date
- Don't have time to log into their account.
Just click on the green button located in your notification email and then click on this button at the bottom of your calendar page.

PLEASE NOTE: It is a requirement of being a TheatreDigsBooker Host to keep your calendars up-to-date, and it will affect your acceptance ratings if you fail to do so. To read more about acceptance ratings, please take a look at our help article, 'What is an acceptance rate?'.
Why cant I see my bookings in the past on my calendar?
Once a date is passed then bookings and availability are removed from your calendar. To see your past bookings Log in as a Host, click on Bookings at the bottom of your screen and then 'Show all Bookings'.
That's it! You have updated your Calendar.
If you have questions please visit our Help Centre
Was this article helpful?
That’s Great!
Thank you for your feedback
Sorry! We couldn't be helpful
Thank you for your feedback
Feedback sent
We appreciate your effort and will try to fix the article


